In this article, there is a detailed note on scan a document on iPhone, Windows 10, and Google docs so, read this full guide. You don’t need a big machine to scan and sign a paper. Instead, you can use your iPhone, Windows 10, and Google Docs to scan a document, turn it into a PDF, and send it where it needs to go in less than a minute. It can make it much easier to fill out forms for a doctor’s visit, sign a lease, or send a contract. Documents that you need can be scanned. You can also change the colour to black and white, sign the document electronically, and combine multiple pages into one PDF file.
How to scan a document on iPhone?
How does an iPhone scan, then? As long as you have an iOS device, you can use your iPhone scanner to scan paper documents, receipts, or anything else. Below are the steps for scan a document on iPhone:
- Get the paper you want to scan ready. Put it on a flat surface and make sure the paper is not the same colour as the background. This is the best way to make sure you get a good scan.
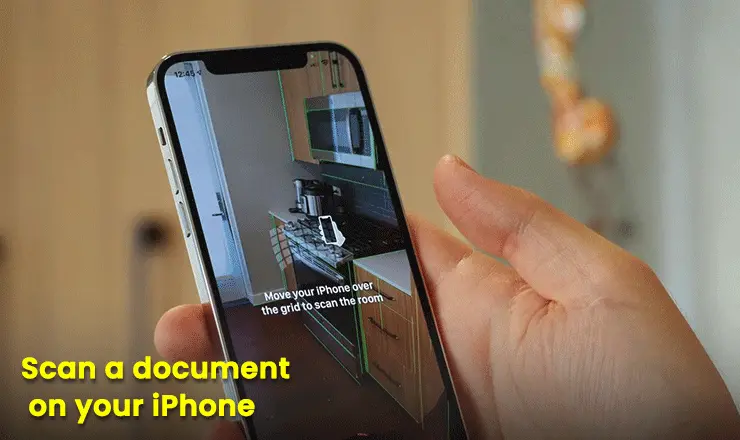
- Open Notes > > in the app. Beginning a New Note Tap a Camera icon > Scan the papers.
- Hold your iPhone or iPad over the paper document and wait for the screen to turn yellow. The document will be scanned automatically. So, you can scan many documents over and over again, or you can just tap the Scan button.
- Do your paper’s corners have circles? Change your scanned file by using them. Tap Keep scan to save it.
- You can see a preview of everything you’ve scanned in the bottom left corner, and it’s easy to swipe through them. If you don’t want to keep the picture, you can crop it, change the filters, rotate it, or just throw it away.
- You can choose to take the scan again at the top if you don’t like it. You can also Save the scans, and they will all show up in a small box called “Scans.” Scroll through them, tap on the ones you want to change, make the changes, and then tap Done to finish.
How to scan a document on Windows 10
When you add a scanner to your computer or mobile device, or to your home network, you can immediately begin scanning photographs and documents. If your scanner doesn’t automatically configure itself, here’s how to get it up and running. Select an option from the drop-down menu or click Show all to see them all. A tutorial on how to make the most of your scanner’s features will load in whatever tab you decide to visit.
- Install or integrate a neighborhood scanner. Most scanners only require a USB connection for setup. Turn on the scanner by plugging its USB wire into a free port on your device. Here’s how to do it manually if that fails. To access the Printers and Scanners window, select the Start menu > Settings > Devices > Printers & Scanners, or alternatively, go here.
- A scanner that communicates over a network, wirelessly, or via Bluetooth can be added or installed. Windows should automatically detect your scanner if it is turned on and connected to the network. To do it manually, follow these instructions. To access the Printers and Scanners window, select the Start menu > Settings > Devices > Printers & Scanners or alternatively, go here. To add a scanner or printer, click the corresponding button. After it detects available scanners, select the one you wish to use and click “Add device” to add it. If your scanner isn’t shown, select “The printer I want isn’t on the list,” and then add it manually.
- Have your scanner ready to go. To check if your scanner is set up, turn it on and then go to your computer’s control panel, where you’ll find an option to open the printers and scanners preferences. Just click “Start,” “Settings,” “Devices,” and “Printers and scanners” to get there. Get into the options for printing and scanning. The scanner can be found in the list of printers and other devices.
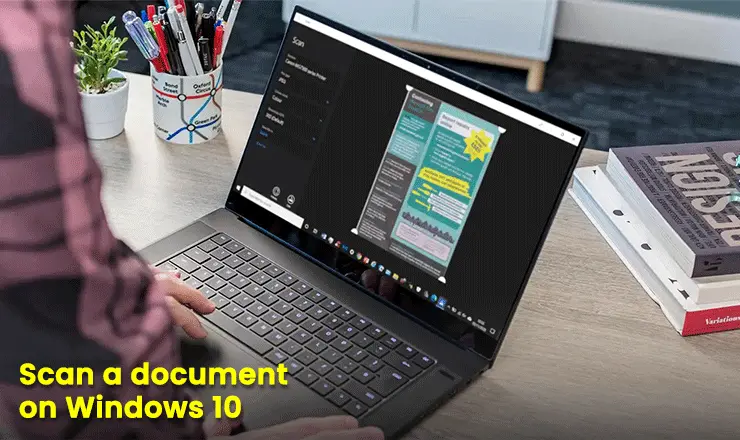
- The Windows Scan programme allows you to scan documents and images. The Windows Scan software can be used to scan images and documents when a scanner has been installed and configured.
- Retrieving previously scanned documents. Select File Explorer from the menu bar and navigate to the location where the scan file was saved. If your scanner is still giving you trouble after trying these solutions, it may be broken. If you are having trouble with your scanner, the manufacturer probably has instructions online.
How to Scan and Add a Document into Google Docs
Before smartphones were common, it was hard to add a scanned file to any document. Documents had to be scanned by hand, and not everyone had a scanner. Luckily, things have changed, and now it’s easy to scan documents on mobile phones and use them in other apps. This is easy to do with Google Docs. When filling out an application, we sometimes had to include important documents or photos that had to be scanned first. How should I do that?
Save a file you scanned as a JPG. The scanned files shouldn’t be saved as PDFs. You should save them as JPGs instead. Lucky for us, many apps that scan offer both ways to save money. Once you’ve saved your scanned document as an image, you can add it to Google Docs. To do that, follow these steps:
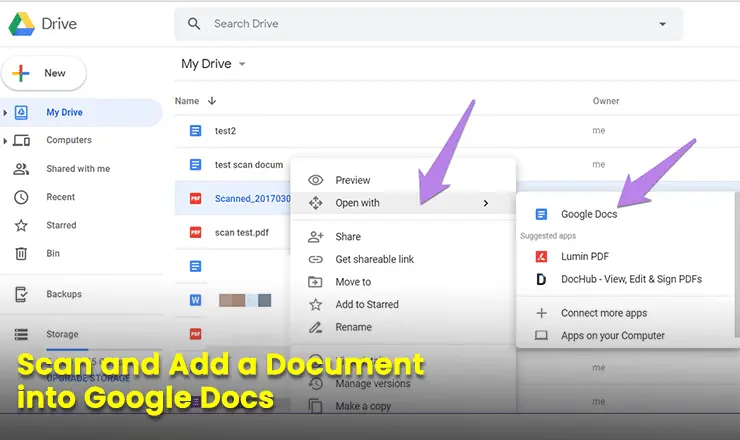
Open the Google Docs app on your phone. Then, open the document you want to add the scanned image to.
Once you’re in the document, tap where you want to add the scanned image and click the “+” sign at the top.
Select Image, then From Photos from the menu.
Look for the scanned picture. It will make what you’re writing better.
If this article How to scan a document on iPhone, Windows 10 and Google docs fully informative then share this article among other people.
You May Also Like:
How might we Sign in and sign up on FB