Do you want to know how to take screenshot on mac? Stay with us to know Well, Most of Apple’s famous Macs now come in M1 and M2 versions, but the way to take a screenshot is still the same. There are three basic ways to take a screenshot with keyboard shortcuts on any modern Mac, and a fourth way if you have a MacBook Pro with a Touch Bar. Apple’s MacOS software also gives you a number of ways to save, delete, or open the screenshot so you can make notes on it. These tips also work for the newest Macs, like the 13-inch MacBook Pro with a new M2 chip and the 13-inch MacBook Air with an M2 chip. From what we’ve seen so far, the same tips work in MacOS Ventura, the next update to the operating system, which is still in beta. In this guide, you’ll learn more about how to take a screenshot on a Mac and how to record video. You’ll also find some useful tools that will make your life easier when taking screenshots on an Apple device.
Screenshot Keys

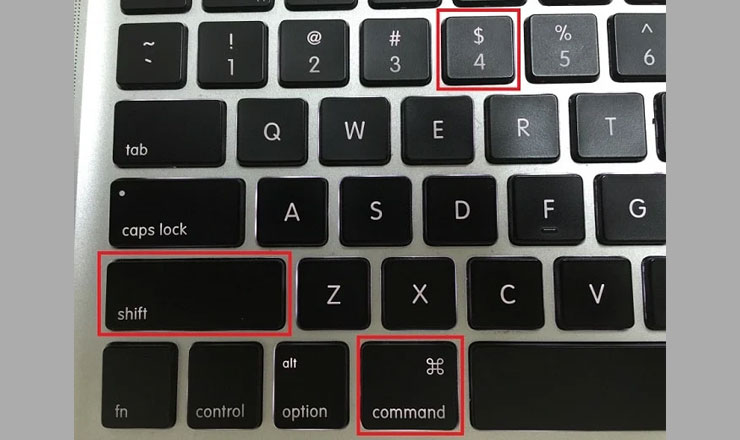
On every Mac, you can take high-quality screenshots that you can change or share as you like. You can take a screenshot of the whole screen, a window, or just a small part of it. For every way to take a screenshot on a Mac, you use the Shift, Command, and number keys.
These are some of the best and easy ways to take screenshots.
- Hold Shift + Command + 3 to take a picture of the whole Mac screen.
- Use Shift + Command + 4 if you only need to take a picture of a small part of your screen. It makes the cursor look like a crosshair. To take a picture of an area, click and drag it, then let go of the mouse.
- Press and hold Shift + Command + 4, and then press Space to take a picture of a specific Mac window. Your crosshair should change into a picture of a camera. To take a screenshot, move your cursor over different windows and click.
- Still, Apple’s built-in tool for taking screenshots only gives you five ways to capture the Mac’s screen. As you read on, you’ll learn that third-party apps can give you a lot more. So let’s find out what you like best.
Capture Screenshot on mac screenshot menu
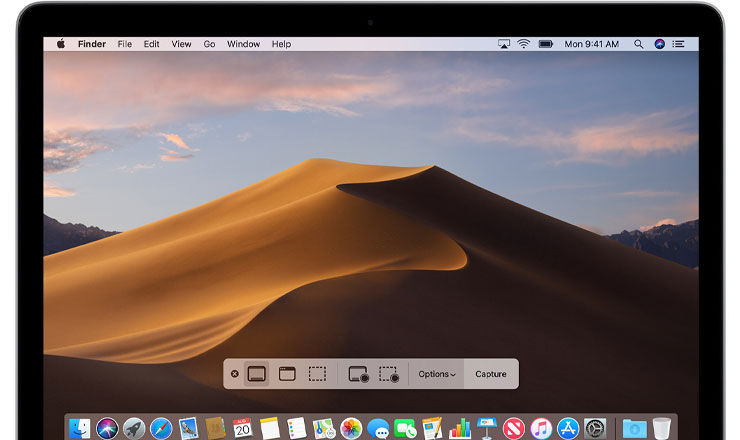
On macOS Mojave and later, you can either open the screenshot menu and choose how to take a screenshot, or you can use keyboard shortcuts for each action, like taking a screenshot of a window or a selected area. Before Mojave, MacOS didn’t have a menu for capturing the screen, but it did have commands for capturing a part of the screen or the whole screen.
If you’re using Mojave, Catalina, Big Sur, or Monterey, you can press Command + Shift + 5 to open a menu that lets you:
- Capture Entire Screen
- Capture the Window You Choose (s)
- Capture the Part You Want
- Save the whole screen
- Record the Chosen Part.
- Mac screenshot with screen menu
Print the screen of the area you chose
Remember when we talked about ways to save time? Let’s get down to business. Here’s how to capture a screenshot on mac of a certain part of the screen:
- Shift, Command, and 4 are the three keys to hold down at the same time.
- Move the crosshair to choose the part of the screen you want to record. To move the selection, press and hold the Space bar and drag it. If you press the Esc (Escape) key, the screenshot won’t be taken.
- To take a screenshot, let go of the mouse or trackpad button.
- If a thumbnail shows up in the corner of your screen, you can click it to change the screenshot. You could also wait until the picture is saved to your desktop.
- Print the selected part of the screen
Take a screenshot of the whole screen.
Follow these steps to take a screenshot on your Mac:
- Press and keep holding Shift, Command, and 3 all at the same time
- Click the thumbnail in the corner of your screen to edit a screenshot. You could also wait for the screenshot to save to your desktop.
Take Screenshot on Mac using Touch bar

If you still think you can’t live without a print screen button like the one in Windows, ask yourself if your Mac has the Touch Bar. If so, you can make a button that only takes screenshots. How it works is as follows:
- Go to Apple > System Preferences > Keyboard from the Apple menu.
- Click on Customize Control Strip
- Choose where on the Touch Bar you want your screenshot button to go, drag and drop it there, and save the changes.
- Now you can take a picture of your Mac’s screen with just your Touch Bar. When you click the screenshot button, a menu to take a picture of the screen will appear. If you want to change where your screenshots are saved, click “Save To.” You can choose to take a picture of the whole screen, a selected area, or a window. Then you can take a screenshot by moving your cursor.
Conclusion
As you can see, it’s not hard to learn how to take a screenshot on mac. In fact, it’s easier than ever now that macOS has a dedicated menu for taking screenshots and videos on a MacBook. It’s clear that Apple knows how hard it is for Windows users to print the screen on a Mac, so the process is likely to get better in the future. In the meantime, there are some great snipping tools for Mac that make the process easier and offer features that you won’t find in the built-in options for taking screenshots on Mac.
You May Also Like:
Download Pinterest videos – How to Download Pinterest Videos?
Download Youtube Videos – How to Download YouTube Videos?